

Over the past three months I have gone from painting for dummies to paintaholic extraordinaire! I have watched a lot of HGTV, taken many trips to the hardware store, spray painted my body black, and scrubbed dripped paint out of the carpet...and I am here to say I survived, thrived, love my old-turned new furniture, and YOU CAN DO IT TOO!
I have learned some key strategies on how to make my painting projects a success. Like many of you, I desire my home to be a reflection of me, a warm and comfortable place for family and guests, and I don't want to pay a fortune for it!
The goal of this post is to inform fellow DIY ladies who are a little timid about getting their paint brush dirty. I was a beginner when I started my furniture renovations and am still learning. From my frugal and impatient tendencies, I have learned a few things that I think will help beginners get their feet wet...so here we go!
#1. Be thrifty, not cheap (or glamorous):
The first place to start is to know what your price range is. I often refuse to pay full price for many things...because I know I can find it cheaper. But at the same time sometimes you have to dish out the extra dollar for things that are worthy investments. The most expensive piece of furniture I have paid for in my recent renovations is $25 for the hutch that I am featuring as my main tutorial. For those of you not familiar with garage sale/thrift store prices...this really is a steal. Please do not go out expecting to find such a huge piece of furniture for the same price...but see this as an example that you can get great finds for super deals.
When you are at garage sales, do not be afraid to bargain. I usually decide a price in my mind that I am willing to pay and offer $10 cheaper. If I'm lucky, I will get it...if not, I still may be able to leave knowing I paid for what I was willing to offer. People feel good about their sale if they feel like they are getting the better end of the bargain...offering low guarantees this possibility for a good sale. And if they are asking way more than you are willing to pay, don't get it! You have to stick to your budget and if you are reasonable, will hopefully find something better. Bargaining took me a couple trips to get comfortable doing but eventually I got the hang of it. I find that often people want to simply get rid of their old stuff...and since I plan to repaint it, the ticket value should be reasonable.
#2. Know what you are looking for:
-Style: To make my furniture look more like Pottery Barn than Target, I look at the way the furniture is cut. It's like a well tailored jacket...you want it to curve in all the right places. Furniture is the same way. I look for pieces that have wood cutting that is unique and not all straight lines. I also look at the hardware. If the hardware is nice, you are already saving yourself a handful as hardware can be expensive brand new. I sometimes will even consider buying a piece just for the hardware. The thing I love about used furniture is that it has so much character and vintage qualities that you would have to pay an arm and a leg for new, yet it is the same price, if not cheaper, as buying a plain straight edged piece from somewhere like Target. Now, I am not totally against straight edged pieces, but in order to give it extra character, you have to do a little more work to embellish it. The hutch tutorial below I spice up a bit, as it does not have as much wood character as I would have liked. I will explain how to do this.
-Style: To make my furniture look more like Pottery Barn than Target, I look at the way the furniture is cut. It's like a well tailored jacket...you want it to curve in all the right places. Furniture is the same way. I look for pieces that have wood cutting that is unique and not all straight lines. I also look at the hardware. If the hardware is nice, you are already saving yourself a handful as hardware can be expensive brand new. I sometimes will even consider buying a piece just for the hardware. The thing I love about used furniture is that it has so much character and vintage qualities that you would have to pay an arm and a leg for new, yet it is the same price, if not cheaper, as buying a plain straight edged piece from somewhere like Target. Now, I am not totally against straight edged pieces, but in order to give it extra character, you have to do a little more work to embellish it. The hutch tutorial below I spice up a bit, as it does not have as much wood character as I would have liked. I will explain how to do this.
Here are some examples of pieces that stand out to me as having extra "character":
I like how the legs curve out on this piece. It's hard to tell, but the bottom edge also has a wavy cut. I also liked this piece because of the open storage area and drawer. These were sliding door panels that I hung on the wall as art. They were brown...retro...and ugly but the white paint really transformed them. The beautiful wood embellishment in the middle is what initially drew me towards the panels. Paying for a wood embellishments like this would cost you probably over $20 just for one. I got all three panels for $5. I also really liked the handles on the ends which gave a little extra character to the set. Click here to see this post.
 Chairs have become a fun collection for me and I have found so many fun different ones. Many of them do not match but are all painted either black or white. The dining table chairs are black but in different styles. The matching colors keep things coordinated while the different styles make things a little more funky and fun. I liked the cut out in this one. Click here for this post.
 Here is the dining table. The fabric covered chairs are different fabrics but share the same black and white theme. Also notice the table's legs...character! Click here for this post.
  This buffet is pretty plain but the short legs on the bottom give it a unique look.
 The doors on the hutch stand out with the cut out panels...especially in white, the wood work really jumps out. Click here for this post.
 One of my favorite pieces (for free I might add!) is the dresser turned entertainment center. This thing was a mess...and Brent thought I was crazy to pick this thing up! Though it had ugly weather worn wood...the cut of the wood is what drew me toward it. Look how it is transformed with some fresh paint! Again, the hardware itself is worth keeping... Click here for this post.
 -Find furniture fit for YOUR home: It is so important to know what you need in your home. It is often tempting to see other people's homes and decide you want that same piece of furniture set up in the exact same way...when really your house is not set up in the same way. You have to know what you need for your home, for your things, and in your budget.
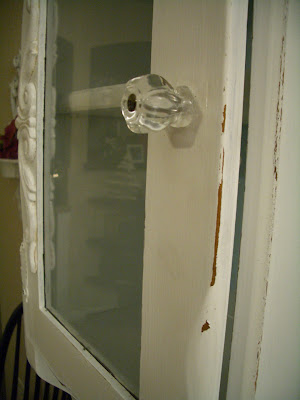
 I taped the glass in preparation for painting the doors but ended up just taking the glass out. I brought the existing glass to the hardware store and had them cut two new clear pieces the same size. It was about $4 for each new piece of glass.
 For most of my white painted projects, I sand the furniture first. But to be honest...sometimes I am too lazy and just start painting! The paint does not grab as thickly when not sanded but still can be painted with an extra coat. I usually do about two or three coats to get the white a rich thick color. I hear primer is supposed to help with this but again, too lazy!
 I picked out pieces where I liked the character. I really like swirls so these looked perfect. I wasn't quite sure where they were going to go so I bought two of each style. After playing with them awhile I decided to add them to the glass door and the bottom doors. I taped them up with blue tape to make sure I liked how they looked before gluing.
I then painted them white along with some of the shelves.
 I sanded them and then re-taped them where I wanted them to go. I marked with a pencil where each end belonged to make sure things were even and straight before I glued.

To finish the whole look I bought glass looking knobs to give it a more classy shabby look. I don't remember how much the hardware was...something like $3 each. I actually think all the extra pieces-paint, embellishments, knobs...came out to about $25, the same price of the hutch! Oh, but so worth it for an updated look!
 These were sliding door panels that I hung on the wall as art. They were brown...retro...and ugly but the white paint really transformed them. The beautiful wood embellishment in the middle is what initially drew me towards the panels. Paying for a wood embellishments like this would cost you probably over $20 just for one. I got all three panels for $5. I also really liked the handles on the ends which gave a little extra character to the set. Click here to see this post.
 Chairs have become a fun collection for me and I have found so many fun different ones. Many of them do not match but are all painted either black or white. The dining table chairs are black but in different styles. The matching colors keep things coordinated while the different styles make things a little more funky and fun. I liked the cut out in this one. Click here for this post.
 Here is the dining table. The fabric covered chairs are different fabrics but share the same black and white theme. Also notice the table's legs...character! Click here for this post. This buffet is pretty plain but the short legs on the bottom give it a unique look.
 The doors on the hutch stand out with the cut out panels...especially in white, the wood work really jumps out. Click here for this post.
 One of my favorite pieces (for free I might add!) is the dresser turned entertainment center. This thing was a mess...and Brent thought I was crazy to pick this thing up! Though it had ugly weather worn wood...the cut of the wood is what drew me toward it. Look how it is transformed with some fresh paint! Again, the hardware itself is worth keeping... Click here for this post.
 -Find furniture fit for YOUR home: It is so important to know what you need in your home. It is often tempting to see other people's homes and decide you want that same piece of furniture set up in the exact same way...when really your house is not set up in the same way. You have to know what you need for your home, for your things, and in your budget.
 It is helpful to break up this process room by room. I have gone through each room and envisioned how I would like to set it up. I decide what pieces of furniture I want and measure to find out what size it should be. I write it all down for each room and keep it in a notebook in my purse along with a mini tape measure. This really helps in finding absolutely perfect pieces and refraining from buying pieces that you may not have room for.
#3. Make paint your friend:
It can be scary to go into the hardware store not knowing where to start. That is what those people in the orange vests are for! Tell them what you want to paint and they will guide you to your next steps. But...at the same time, they are not painting geniuses either. If something doesn't seem right, research it online yourself or be willing to make mistakes...you can fix it! And though I have gotten many of my ideas from HGTV and magazines, sometimes their projects are much more advanced for what I am capable or willing to do. It is okay to take shortcuts and try doing it a different way.
Get a bucket of paint (get a small bucket if you are trying out a new color...you can always buy more later or not feel so bad when you throw out the hot pink you thought would look red!)...a few paint brushes/rollers/sponges in different sizes, some cardboard or newspaper to lay down, and some old clothes to get dirty. As time goes by you will get more comfortable with what you are doing and discovering your preference of how to do things and which tools to use. Start with the basics and learn as you go.
As for paint, I am, by far, not a professional. I use semi-gloss for things that may get wet or dirty...tables, chairs, coffee table...this type of paint is easy to wipe off but also tends to have a shinier finish. Too shiny? I buff away with a sanding block...less shiny and more shabby! Flat paint has a duller finish. And that's about all I know! ;)
#4. Know what you are getting yourself into:
Depending on how zealous you are, you can get multiple projects done in one day or spend months on just one (umm...my hutch!). Where are you going to paint? What is the weather? Do you have a place to store an unfinished project without it uglifiying your house? Painting also requires some physical activity...your arm will get tired...you may have to bend over for an excessive amount of time. This isn't to scare you away but remind you of the reality of the work! If you get sick of it, take a few days off...or maybe you just need to get it done in one day and have it out of the way. Know what you are getting yourself into...stick to your dream piece of furniture and make it happen!
And now...how to make it happen...
Painting 101-Hutch Tutorial:
Here it is in all its glory! I failed at taking a complete before picture. The backing was wood like the rest of it. I am just one step ahead in painting it blue. As you can see, there was some awful 70s looking yellow glass and well...it is a pretty plain hutch. But with a sticker price of $25 I just couldn't pass it up...I will make it the dream hutch I have always wanted. ;)
Here it is in all its glory! I failed at taking a complete before picture. The backing was wood like the rest of it. I am just one step ahead in painting it blue. As you can see, there was some awful 70s looking yellow glass and well...it is a pretty plain hutch. But with a sticker price of $25 I just couldn't pass it up...I will make it the dream hutch I have always wanted. ;)
 I taped the glass in preparation for painting the doors but ended up just taking the glass out. I brought the existing glass to the hardware store and had them cut two new clear pieces the same size. It was about $4 for each new piece of glass.
 For most of my white painted projects, I sand the furniture first. But to be honest...sometimes I am too lazy and just start painting! The paint does not grab as thickly when not sanded but still can be painted with an extra coat. I usually do about two or three coats to get the white a rich thick color. I hear primer is supposed to help with this but again, too lazy!
 For this project, I painted the back blue first. You can tape the edges before painting a second color...but I try to just keep a steady hand when doing the second color...you can always repaint or wipe off right away if it starts getting messy!
Once I finished painting the hutch it didn't look quite right. I shabbied it up a bit by using a sanding block to sand some of the edges. The sanding helps the curves and details stand out more. I try to sand the edges, corners, and other places where it would look like natural wearing (like around the handle). It looked better but because it was so plain, it still wasn't what I wanted. So I headed over to the hardware store again (they know me by name by now!) to pick up some wood embellishments.
 I picked out pieces where I liked the character. I really like swirls so these looked perfect. I wasn't quite sure where they were going to go so I bought two of each style. After playing with them awhile I decided to add them to the glass door and the bottom doors. I taped them up with blue tape to make sure I liked how they looked before gluing.
I then painted them white along with some of the shelves.
I sanded them and then re-taped them where I wanted them to go. I marked with a pencil where each end belonged to make sure things were even and straight before I glued. I used wood glue and clamps to hold the wood pieces on. Clamps come in various sizes and prices. They do the same job but different sizes are required for how far away the edge is from what you are clamping. I used a q-tip to apply the glue since the wood pieces were so small. I also went back and wiped some of the excess glue off after being clamped. I put a piece of wood in between the clamp and hutch so that the clamp would not dig into the newly painted hutch. I let the clamps stay on overnight to ensure secure gluing (second picture). 


To finish the whole look I bought glass looking knobs to give it a more classy shabby look. I don't remember how much the hardware was...something like $3 each. I actually think all the extra pieces-paint, embellishments, knobs...came out to about $25, the same price of the hutch! Oh, but so worth it for an updated look!
A couple little touch ups...a few more shabby sanding...and there she is! The embellishments and knobs really make this thing spectacular!
 My goal was to have it match this cute little hutch.
 Some close ups...


 I choose to paint the black blue so that my white dishes would stand out against some color. It is subtle enough to not be super noticeable but just bright enough to showcase the dishes.
 $50 later...a new, personal, beautiful piece of furniture that I get to brag about!

 As you can see, with a little paint and a whole lot of determination you, too, can make timeless pieces for your home at a fraction of the cost.
My goal was to have it match this cute little hutch. Some close ups...

 I choose to paint the black blue so that my white dishes would stand out against some color. It is subtle enough to not be super noticeable but just bright enough to showcase the dishes.
 $50 later...a new, personal, beautiful piece of furniture that I get to brag about!
 As you can see, with a little paint and a whole lot of determination you, too, can make timeless pieces for your home at a fraction of the cost.
 I hope this was helpful to those of you who may be too timid to get the ball rolling. I have made many mistakes and have gotten extremely frustrated because something was not looking quite right. But I keep on going until I get it perfect.
The reward of feeling satisfied with a piece of furniture that fits perfectly in your home is so worth it!


WOW!! That turned out so pretty!! I'm soooooo impressed -- the scrolly things just MAKE this. I love it!!
ReplyDeleteI'm applauding you. I have a total hate of painting - but your tutorial made this seem so easy and attanable. I felt like I was reading a magazine article. Your hutch looks amazing! Thanks for the wonderful tips!
ReplyDeleteThat looks great! I'm glad to see you consider primer optional as well! Sometimes a girl just has to start painting!
ReplyDeletethe finished project is amazing. thanks so much for sharing - i love this post! so helpful!
ReplyDeleteAshley, that is AMAZING!!! Your hutch turned out so gorgeous. I am totally impressed and inspired. I had actually forgotten about the coffee table I bought at a yard sale a couple months ago. It is buried in the depths of despair that is my garage. I know what my next project will be!
ReplyDeleteGREAT WORK!
xoxoxoxoxoxoxo ~ Amanda
You're so good at this. We REALLY need to paint our house and put up curtains (we've been in our house almost 3 years) but I'm such a decorating dummy. Your stuff looks straight out of a chic boutique!
ReplyDeleteWant to save my house? I'll be like a Blogging Worst Decorated show!
Great Post.. so detailed. I love it. I have done this many times in my home. I, like you, hate to spend full price for anything. You did a great job with inspriation to continue in my home, to keep going and continue to find new things to change with a little imagination and inspriation... Every re-upholster anything?? I have a chair and ottaman I would like to have recover and thought I could do it.. any suggestions?
ReplyDeleteAshley, this post was perfect timing. I was thinking all day today (well all morning) that I need to get some antique white paint and start painting a few things around my place but there was something holding me back. Fear? I wasn't sure...but this post made me feel powerful! Thank you! I am ready to paint like a mad woman now! It's amazing how paint transforms things. I will forever look at garage sale items with a new pair of eyes. :)
ReplyDeletewow, you're my kind of girl!
ReplyDeleteI have so many of these projects just waiting to be got to...!
You've inspired me to go see what I have...!
V.
Wow. That is amazing. My parents like to do stuff like that. I think I am a little intimidated by it.
ReplyDeleteHappy New Year!
I wandered over to your blog from SITS.
Ashley, thank you for stopping by! I think this is the first time I've met you, so if it is, it is SO nice to meet another girl who loves to transform things as much as I do. Love all your furniture redos & I see you're going to come to my party next Wed.! YAY! Can't wait to see what all your before & afters look like. And I can't wait to go back & see your other projects. I'm adding you to my bloglist so I can find you again & I would love it if you would "follow" me too! Ashley, you're a girl after my own heart!
ReplyDeleteWow-I'm impressed with your talent. Loved looking at your pictures and how you did things. I'll definitely be back to see you!
ReplyDeleteThis is a seriously fantastic article! Great job! I love your projects and that hutch is A-MAZING!
ReplyDeleteKimba
Your hutch look great. It is so much fun to see the befores.
ReplyDeleteI LOVE to paint! And your hutch looks great! Gotta love good finds :)
ReplyDeleteYou certainly have found your niche. Thanks for sharing. Happy Show 'n Tell Friday!
ReplyDeleteAwsome tuit!
ReplyDeleteI love painting old things and vaping them. I just havent done it in so long.
Thanks for stoping by on my sausy week.
It's wonderful how a little paint can be a breath of new life for any piece.
ReplyDeleteWow...what a bargain and what a great job of refinishing it you've done!! Wish I could find some deals like that! I need a couple of bookshelves really badly! Thanks for taking the time to do a great tutorial!!
ReplyDeleteBlessings, Becky
That is just gorgeous. I love the details along the sides and on the doors.
ReplyDeleteYou do have bragging rights! It looks so great after all your hard work.
ReplyDeleteThese projects are amazing! I love the finished hutch! And your tutorial is very helpful!
ReplyDeleteGreat job and great deals!
Linda C
Great tutorial & I love how the patio chairs turned out from in the previous post.
ReplyDeleteI have not done anything like this in quite a while......this really gets me in the mood! Your pieces turned out so well....just beautiful. I have some patio chairs that are very similar to those in your last post. I think I'll start with those. Thanks.
ReplyDeleteElaine
You have been busy! Beautiful pieces of furniture!
ReplyDelete~Kelli
This piece is A-MA-ZING! And you really made it look easier than I would've imagined. I've been too afraid to start a project like this because I didn't know where to start! Thanks, and great job!
ReplyDeleteI LOVE this hutch! It turned out beautiful! Where do you find these amazing pieces? The hutch, the wood panels, the table and chairs? I think i've found my new addiction!
ReplyDeleteThis is awesome!! Thanks for the great tips!
ReplyDeleteBravo! Great job.
ReplyDeleteSee I love this...But I would never see the "after" if I was shopping and saw the "before". That's talent!
What great projects! Can't wait to keep reading your blog!
ReplyDeleteThat looks fabulous!
ReplyDeleteWow oh wow!! Love all your re-dos!
ReplyDeleteLoving your blog and your taste!! Amazing transformation on the hutch!!!! LOVE IT!! Can't wait to see more of this great blog!
ReplyDeleteTake care....
Tiffany from The Childrens Nest
Your very inspiring. I'm going to my garage to get out my sander and start working on that nightstand that's been waiting for a year to be painted. Plus, I'm going to keep poking around your blog.
ReplyDeleteThat hutch turned out fantastic!! Looking around on this little blog party is starting to make me a little more than antsy to start a project!
ReplyDeleteWow~amazing transformations! Thunderous applause coming from Phoenix. Well done.
ReplyDeleteLooks great! I invite you to drop by my place and see my before and after's.
ReplyDeleteWow! I am amazed at how this looks...and, it is bazaar but I have this same hutch! I have been contemplating painting it red. Right now it is in our sunroom and the dark wood is so dreary...you have given me inspiration to paint, paint, paint.
ReplyDeleteRochelle
Ashley, what a great tutorial and such beautiful peices you've shown us all. You are such an inspiration, thanks for a great bloggy read!
ReplyDeleteAshley, my new friend! Thanks for playing along in my party & I'm so glad to have met you recently. I look forward to a lot more fun stuff in 2009. You have done some fabulous things. Come & see me often!
ReplyDeleteThat hutch is incredible! I am in wondering awe! I would pay lots of money for one just like it, I would pay YOU for one just like it. Thanks for the inspiration.
ReplyDeleteWhat a wonderful project. Thanks for the tutorial. Your hutch is beautiful!
ReplyDeleteThanks!
Jen
OMG! I have that same terrible ugly hutch in my living room right now. Its one of my projects one if stops raining. You did a wonderful job on it and gave me some great inspiration!
ReplyDeleteI am so impressed with the transformation. I have a kitchen table that I’ve been wanting to paint for years and I think it’s time I dive into that project. Great post! www.homewithmandy.com
ReplyDeleteGREAT job!! It all looks FANTASTIC!
ReplyDeleteAAAAAAHHHHH! I'm gonna need a bigger house to put all my new stuff that you've inspired me to create!
ReplyDeleteYou know, instead of sanding you can always wash it down with some TSP-- found in all hardware stores in the paint department, runs about $3 bucks. Great makeovers :-)
ReplyDeleteYou are a wizard Ashley. All of these projects are amazing and beautiful. I especially loved the swirley wooden applique pieces you added. The line that made me laugh though, was, "I spray painted my body black." Hope it washed off okay. : )
ReplyDeleteThanks for joining in! You're right! no one should be afraid of paint! :) jen
ReplyDeletePaint is a good thing, and you clearly and wonderfully show that. The hutch redos are fantastic!
ReplyDeleteIt looks amazing...great job.
ReplyDeleteThe blue is a wonderful touch in the transformation!
ReplyDeleteVery impressive! I love painting things white.
ReplyDelete-FringeGirl
That was fun and informative, and best of all, you created a great piece! I enjoyed your post!
ReplyDeleteThe Texas Woman
Wow!!! I think we should be friends! I am currently posting some of my new remakes on my blog- You are inspiring! It's fun to find people who enjoy salvaging old pieces with history and making them new again!
ReplyDeleteSo I'm a complete stranger that loves to get ideas from your blog. Your hutch project turned out fantastic and inspired me. I was at the Goodwill today and found me a $5 coffee table that has some potential. My question is did you use latex or oil based paint for this? could you email me at aggiegirl00@hotmail.com and let me know your secrets!!! thanks!
ReplyDelete